< Flutter 활용하기 – Skeleton Program for Future Usage >
Flutter가 강력하다고 느낀다면 다행이지만, 처음 모바일 프로그래밍을 cross-platform으로 시도한다면, 뭐가 좋은건가 싶을 것 입니다. 아마도 “왜 이렇게 복잡한거야?”하고 의문을 가질수도 있습니다. 개인적으로 JavaScript 기반의 corss-platform인 Cordova과 PhoneGap을 다뤄본 입장에서, JavsScript 기반의 접근은 진입 장벽이 의외로 높았다고 볼 수 있습니다. JavaScript, HTML, CSS 등의 언어에 대한 이해도 필요하지만, 사용자 인터페이스를 이 기술들로 만드는 작업은 매우 고되며, 디바이스에 맞춰서 사용자 인터페이스를 조정한다는 것도 만족스러운 품질을 얻기 어렵습니다.
이번 글이 Flutter의 마지막에 해당하는 글이기에, 향후를 대비하여 나름 두고 두고 재활용 할 수 있는 형태의 프로그램을 만들고자 합니다. 이를 토대로 본인이 원하는 기능을 채우고, 기능에 적합한 형태의 사용자 인터페이스로 개선하는 작업을 할 수 있을 겁니다.
Step.1 Select Widgets
“Widget is Everything” 이라는 표현이 여러번 등장 한 것처럼, Widget들의 존재를 알고, 이해한 후, 이들을 엮는 기술은 Flutter를 사용함에 매우 중요한 기술 입니다. 이를 위해서, 다음의 단계를 권합니다.
첫번째로 Flutter에서 제공하는 Widget 들이 너무 많기에, 어떤 Widget이 있는지 알고, 쓸만한 Widget을 선택하는 방법이 필요 합니다. 아래는 그림과 글을 통해서 Flutter의 Widget들을 찾아볼 수 있는 사이트 입니다.
- https://flutter.dev/docs/reference/widgets
- https://flutter.dev/docs/development/ui/widgets
시간이 있다면, 실제로 동작하는 화면과 간단한 설명을 볼 수 있는 YouTube를 추천합니다. Dart/Flutter는 아래와 같이 공식 YouTube를 통해서 각종 행사와 기술 발표에 대한 사항을 동영상으로 배포하고 있습니다.
- https://www.youtube.com/channel/UCwXdFgeE9KYzlDdR7TG9cMw
특히, 이 YouTube에서는 “Flutter Widget of the Week” 모토 아래 매주 Flutter Widget 중 하나를 짧은 동영상으로 소개하여, 동작 화면과 핵심 코드를 이해할 수 있도록 하고 있으니, 필요할때 살펴보다가 마음에 드는 Widget을 점 찍어 두면 요긴하게 쓸 수 있습니다.
- https://www.youtube.com/watch?v=b_sQ9bMltGU&list=PLjxrf2q8roU23XGwz3Km7sQZFTdB996iG
두번째로 선택한 Widget에 대해서 자세히 알아야 합니다. 이를 위하여, Flutter의 공식 홈페이지에는 다음과 같이 Widget들을 리스트로 나열하고, 각각의 Widget에 대해서 필요시 상세하게 이해할 수 있는 다음의 사이트를 제공합니다.
- https://api.flutter.dev/flutter/widgets/widgets-library.html
본 글에서 설명할 darttutorial-35-01.dart 프로그램에서도 다양한 Widget 들을 사용합니다. 이들에 대해서 자세하게 이해하고 싶은 경우는 아래에서 해당 Widget에 대한 상세한 정보를 읽고, 실제 프로그램에서 사용하였습니다.
- https://api.flutter.dev/flutter/material/Scaffold-class.html
- https://api.flutter.dev/flutter/material/OutlineButton-class.html
- https://api.flutter.dev/flutter/material/Icons-class.html
- https://api.flutter.dev/flutter/material/SliverAppBar-class.html
- https://api.flutter.dev/flutter/material/ListTile-class.html
- https://api.flutter.dev/flutter/material/Drawer-class.html
- https://api.flutter.dev/flutter/widgets/Text-class.html
- https://api.flutter.dev/flutter/widgets/PageController-class.html
- https://api.flutter.dev/flutter/painting/TextStyle-class.
세번째로 위의 Widget 설명들을 보다보면, 본인이 만들고자 하는 프로그램에 영감을 주는 유용한 sample들을 발견하는 경우들이 있습니다. darttutorial-35-01.dart 경우는 애시당초 통신 관련 프로그램을 작성하기 위한 일환으로 Widget들을 살펴보던 중, 나름 잘 맞아 보이는 다음의 예제 프로그램을 토대로 만들어 보았습니다.
- https://flutter.dev/docs/catalog/samples/basic-app-bar
- https://androidmonks.com/sliverappbar-flutter/
Step.2 GUI Design
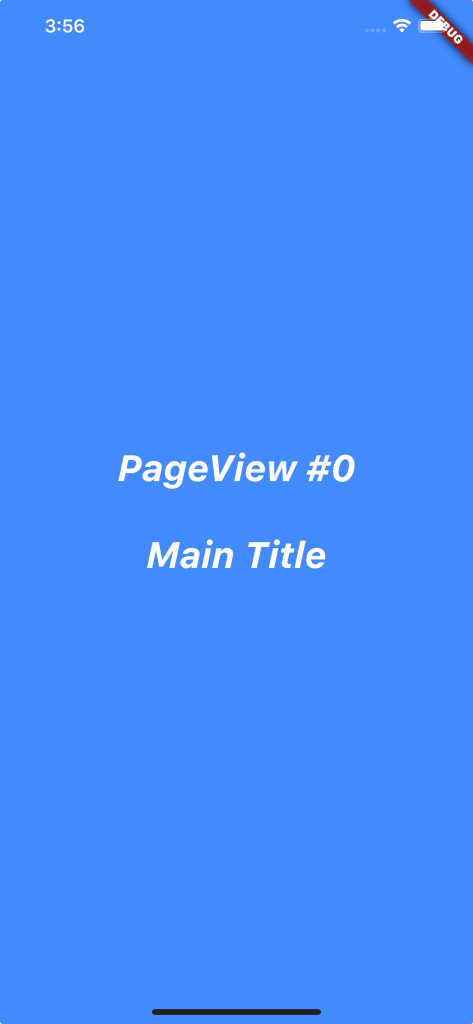
이 프로그램은 총4개의 페이지로 구성되며, 첫번째 페이지는 [그림 1]이며, 프로그램이 최초로 실행하면 나타나는 페이지 입니다. 별도의 기능은 없으며, 단순하게 프로그램의 이름을 보여주는 용도일 뿐입니다. 이 페이지를 오른쪽에서 왼쪽으로 밀면 다음 페이지로 이동합니다.
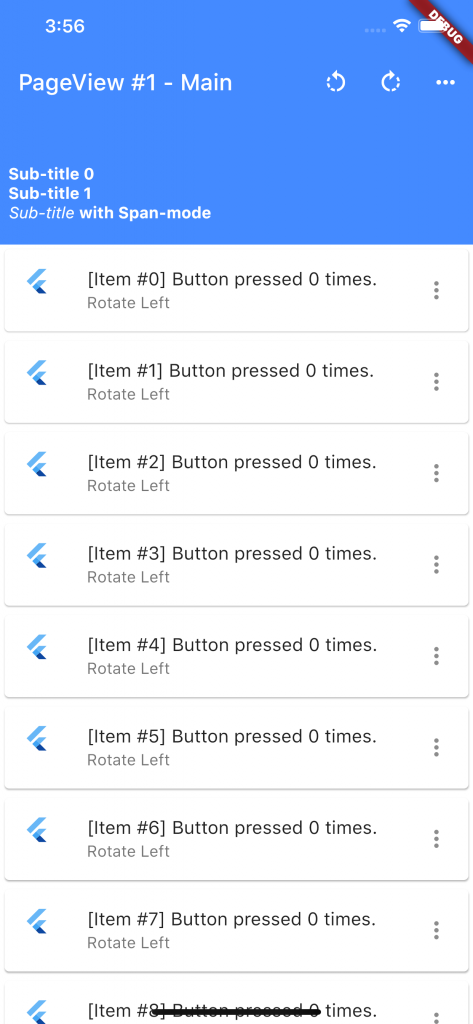
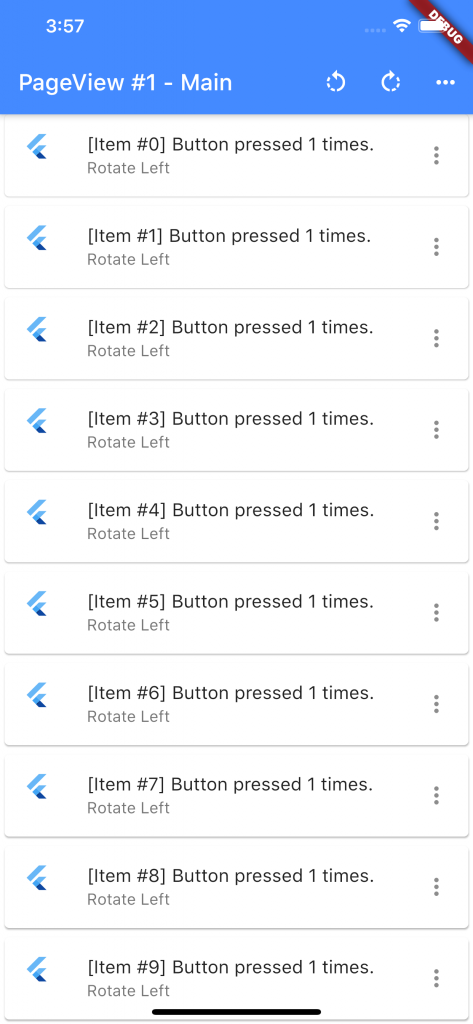
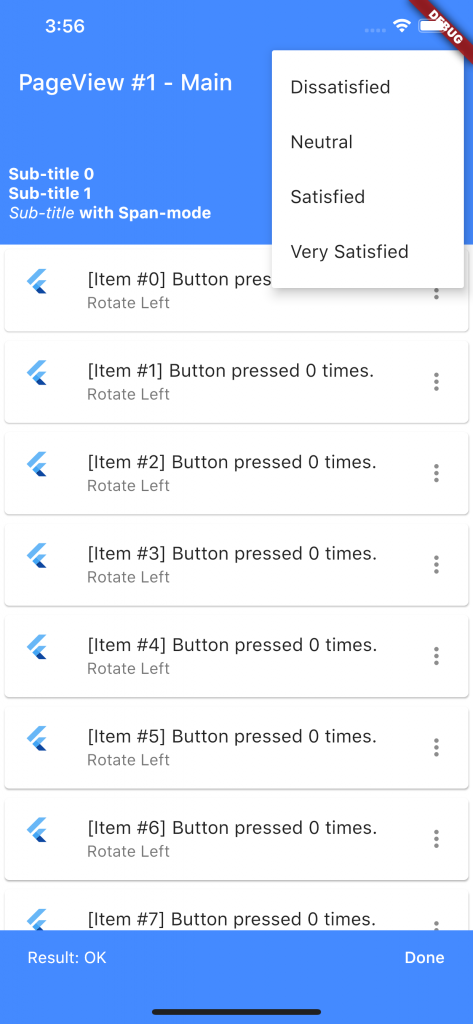
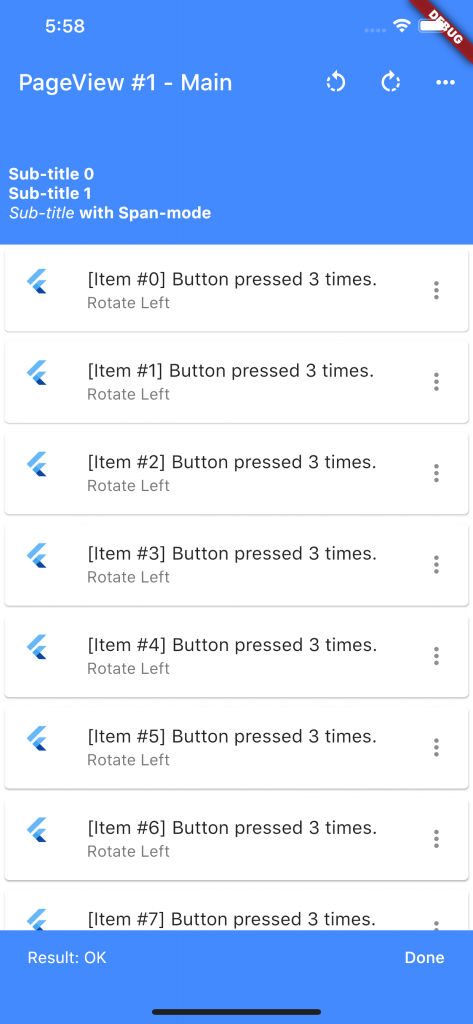
주 작업을 진행하는 페이지가 [그림 2] 입니다. 세 부분으로 나누어져 있으며, 윗쪽의 두부분은 같은 색인 파란색으로 채워져 있습니다. 하나로 보이지만, [그림 3]처럼 파랑색 밑의 부분을 스크롤 업 하면, 첫번째 부분은 그대로 고정되어 있지만, 두번째 해당하는 부분은 스크롤이 되어 화면에서 사라지는 것을 볼 수 있습니다.
첫번째 영역은 왼쪽에 타이틀로 필요한 이름을 나타내고 있고, 오른쪽에 세개의 버튼이 있는 것을 볼 수 있습니다. 세개의 버튼에 대해서는 추후 설명합니다. 두번째 영역에는 사용자에게 알려주고 싶은 정보를 문자열로 나타내고 있습니다. 그리고 세번때 영역에는 터치하여 선택이 가능한 메뉴들이 리스트로 나타나 있습니다.
앞서 언급 한 것처럼, 맨 윗 부분은 그대로 유지되고 있습니다. 하지만, 두번째 영역은 리스트들과 함께 위로 올라가서 사라진 것을 볼 수 있습니다.
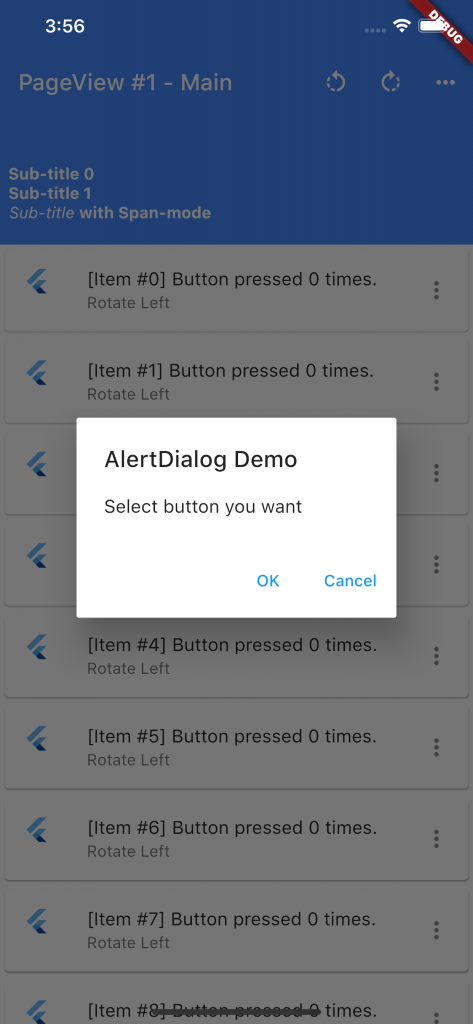
맨 윗 부분의 세개 버튼 중 왼쪽에서 첫번째 버튼을 터치하면, [그림 4]와 같이 AlertDialog 박스가 나타나는 것을 볼 수 있습니다. 일반적인 다이얼로그의 형태로서, “OK” 혹은 “Cancel” 중 하나를 선택하도록 합니다. 두 버튼 중 하나를 누르면, 화면 아래에 몇초간 파란 화면이 생긴 후, OK 혹은 Calcel 이라는 글자가 나타나는데, 이는 SnackBar라고 부르는 Widget으로 구현한 것 입니다.
(주 작업 페이지)
가운데 버튼에는 아무런 동작을 연결하지 않았기에 터치를 해도 반응을 하지 않을 겁니다. 맨 오르쪽의 버튼은 팝업 메뉴를 나타냅니다. 그리고 메뉴는 총4개로 나타나 있는 것을 볼 수 있습니다. 사진에는 나타나지 않지만, 맨위의 세개 버튼 중 왼쪽/가운데 버튼과 팝업 메뉴 중 네개 메뉴는, 메뉴가 눌려졌을때 하단의 리스트안의 문자열이 바뀌며([그림 5]의 경우, “Rotate Left”로 명시한 부분), 문장의 “0 times”의 숫자가 하나씩 증가하도록 되어 있습니다. 따라서, 단추를 터치하는 일이 리스트 내부에 대한 변화를 만들도록 되어 있습니다. 팝업 메뉴는 메뉴 이외의 화면 영역을 터치하면 사라집니다. [그림 10]에 이를 나타내었습니다.
(주 작업 페이지)
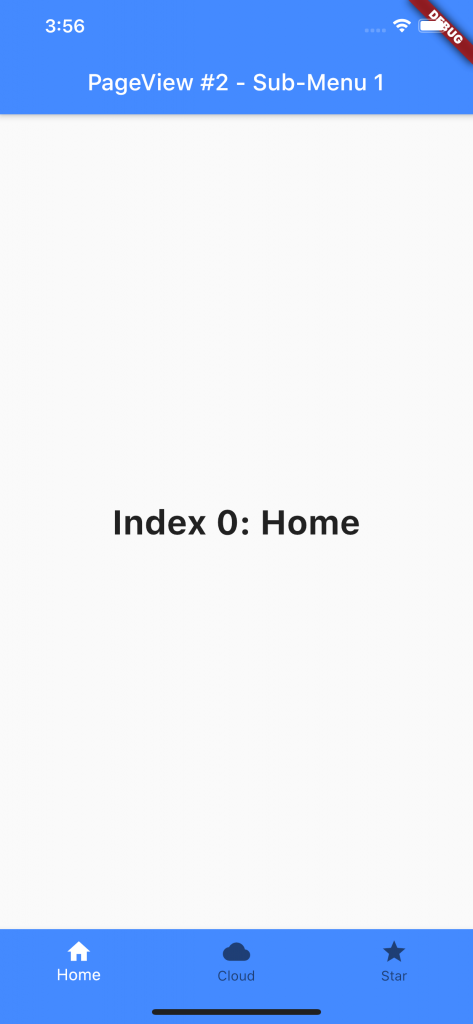
본 페이지에서 화면을 오른쪽에서 왼쪽으로 스크롤하면 [그림 6]으로 이동하고, 왼쪽에서 오른쪽으로 스크롤하면 [그림 1]로 이동할 수 있습니다. 그리고 리스트의 항목 중 [Item#0]라고 쓰여진 첫번째 항목을 선택하면, [그림 6]의 페이지로 이동하고, 다른 항목을 선택하면 [그림 9]의 페이지로 이동합니다. [그림 6]은 아래에 3개의 터치 버튼이 있습니다. 첫번째 home 버튼을 누르면, 화면은 주 작업 페이지인 [그림 2]로 이동합니다.
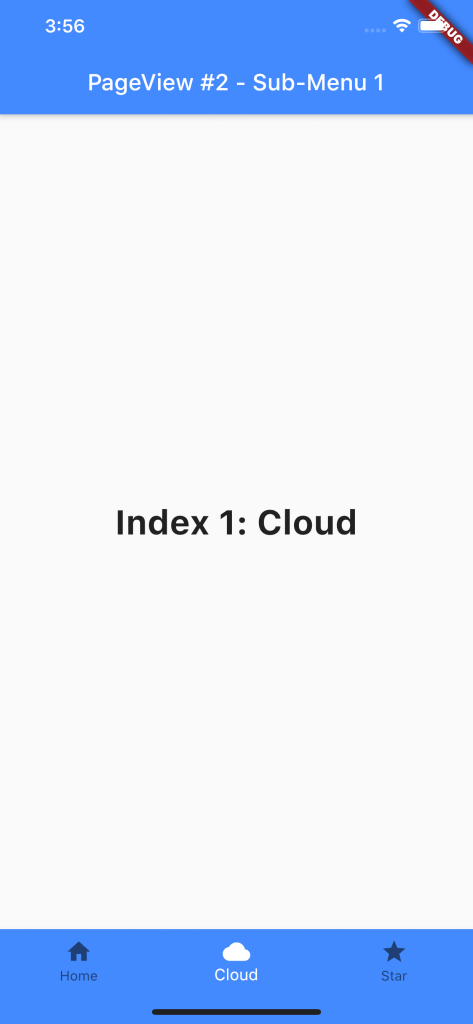
[그림 6]에서 가운데 Cloud 버튼을 누르면, Cloud 버튼의 색이 하얀색으로 바뀌면서, 가운데 글자가 [그림 7]과 같이 바뀝니다.
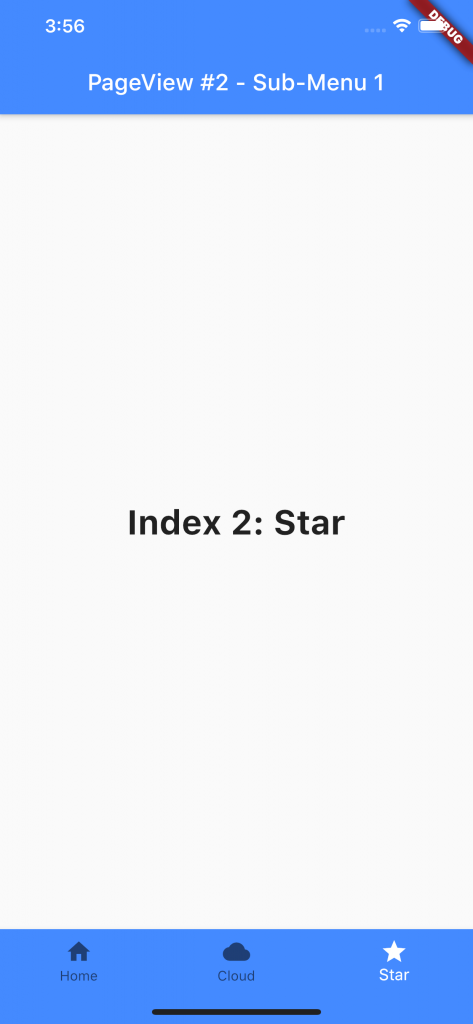
[그림 6]에서 세번째 Star 버튼을 누르면, Star 버튼의 색이 하얀색으로 바뀌면서, 가운데 글자가 [그림 8]과 같이 바뀝니다.
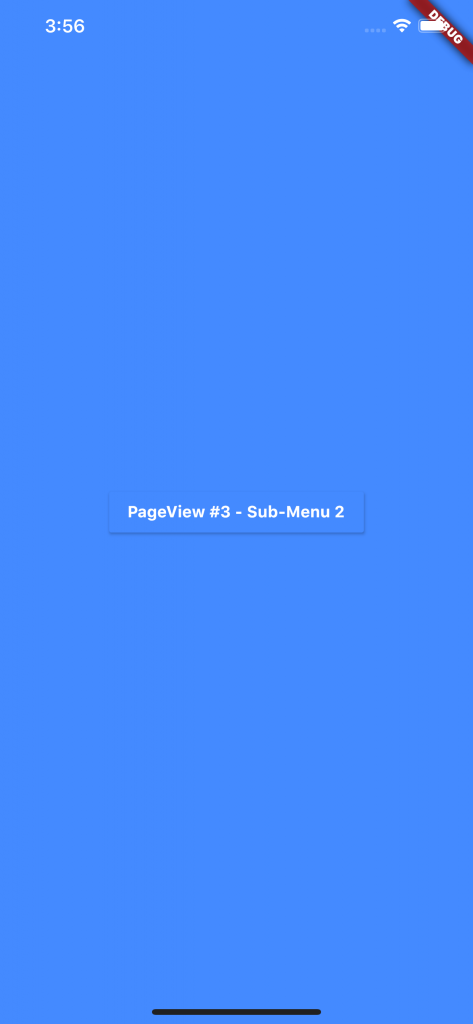
[그림 9]는 화면을 스크롤해서 가거나, 주 작업 페이지에서 첫번째 리스트를 터치하여 이동할 수 있습니다. 가운데에 클릭하면 주 작업 페이지로 이동할 수 있는 RaisedButton이 있는 것을 제외하면, 다른 역할은 없습니다.
[그림 10]의 SnackBar는 앞서 설명한 것처럼, 사용자의 입력에 반응해서, 임시적으로 결과를 보여준 후 다시 사라지는 용도로 활용합니다.
이 정도의 기능이라면 왠만한 기능의 앱을 만들기에는 충분히 효과적인 기본 바탕이 될 것 입니다. 그리고, 사용자 인터페이스가 다소 복잡해 보이지만, 기본이 되는 간단한 Widget들을 엮어서 고도화된 사용자 인터페이스를 구현하는 것이 가능하다는 것을 알 수 있습니다.
Step.3 Completes the Functions
Step.2와 같은 GUI를 구현하는 Dart/Flutter 소스코드는 아래와 같습니다. 가장 복잡하지만, 사용자 인터페이스에 직결되는 부분은 State<> class를 확장한 MyStatefulWidgetState의 build() 입니다. 앞서 설명한 4개의 페이지에 대한 코드를 각각 PageView #0 ~ #3으로 명시 하였습니다. 4개의 페이지가 각각 [그림 1], [그림 2], [그림 6] 그리고 [그림 9]에 대응하는 코드들 입니다. 예상 하겠지만, 두번째 페이지가 가장 많은 분량으로 여러 Widget들로 만들어져 있는 것을 볼 수 있습니다.
사실 이 프로그램에서 저장하고 관리하는 정보는 3가지 뿐입니다. 하나는 주 작업 페이지에서 리스트를 선택할 때 마다 증가하는 count 값이고, 두번째는 리스트에 나타나는 문자열 정보로서, 이는 주 작업 메뉴에서 상단부의 버튼들에 의해서 정해 집니다. 세번째는 [그림 6]의 서브 페이지에서 하단 부의 세가지 버튼 중 어느 것이 선택되어 있는지에 대한 정보입니다. State<> class를 확장한 MyStatefulWidgetState class에 저장되어 있습니다.
프로그램 소스 코드에 대한 구체적인 이해는 독자의 몫으로 남겨 놓도록 하겠습니다. 344 라인 정도의 프로그램이므로, 페이지별로 끊어서 앞서의 라이브러리 등을 찾아가며 이해한다면, 추후 필요한 형태로 변형하고 기능을 채우는데 문제가 없을 겁니다.
// darttutorial-35-01.dart

import 'package:flutter/material.dart';

void main() => runApp(MyApp());

class MyApp extends StatelessWidget {
  static const String _title = 'Flutter Code Sample';

  @override
  Widget build(BuildContext context) {
    return MaterialApp(
      title: _title,
      home: MyStatefulWidget(),
    );
  }
}

class MyStatefulWidget extends StatefulWidget {
  MyStatefulWidget({Key key}) : super(key: key);

  @override
  _MyStatefulWidgetState createState() => _MyStatefulWidgetState();
}

class _MyStatefulWidgetState extends State<MyStatefulWidget> {
  int _count = 0;
  Choice _selectedChoice = choices[0]; // The app's "state".
  int _selectedIndex = 0;

  final scaffoldKey = GlobalKey<ScaffoldState>();

  static const TextStyle optionStyle =
      TextStyle(fontSize: 30, fontWeight: FontWeight.bold);

  static const List<Widget> _widgetOptions = <Widget>[
    Text(
      'Index 0: Home',
      style: optionStyle,
    ),
    Text(
      'Index 1: Cloud',
      style: optionStyle,
    ),
    Text(
      'Index 2: Star',
      style: optionStyle,
    ),
  ];

  void _onItemTapped(int index) {
    setState(() {
      _selectedIndex = index;

      print("_onItemTapped : $index");

      if ((_pageController.hasClients) && (index == 0)) {
        _pageController.animateToPage(
          1,
          duration: const Duration(milliseconds: 10),
          curve: Curves.easeInOut,
        );
      }
    });
  }

  void _select(Choice choice) {
    // Causes the app to rebuild with the new _selectedChoice.
    setState(() {
      _selectedChoice = choice;
    });
  }

  void showAlertDialog(BuildContext context) async {
    String result = await showDialog(
      context: context,
      barrierDismissible: false, // user must tap button!
      builder: (BuildContext context) {
        return AlertDialog(
          title: Text('AlertDialog Demo'),
          content: Text("Select button you want"),
          actions: <Widget>[
            FlatButton(
              child: Text('OK'),
              onPressed: () {
                Navigator.pop(context, "OK");
              },
            ),
            FlatButton(
              child: Text('Cancel'),
              onPressed: () {
                Navigator.pop(context, "Cancel");
              },
            ),
          ],
        );
      }, // builder
    ); // showDialog

    scaffoldKey.currentState
      ..hideCurrentSnackBar()
      ..showSnackBar(
        SnackBar(
          content: Text("Result: $result"),
          backgroundColor: Colors.blueAccent,
          action: SnackBarAction(
            label: "Done",
            textColor: Colors.white,
            onPressed: () {},
          ),
        ),
      );
  } // showAlertDialog

  PageController _pageController;

  @override
  void initState() {
    super.initState();
    _pageController = PageController();
  }

  @override
  void dispose() {
    _pageController.dispose();
    super.dispose();
  }

  @override
  Widget build(BuildContext context) {
    return MaterialApp(
      home: Scaffold(
        key: scaffoldKey,
        // PageViews
        body: PageView(
          controller: _pageController,
          children: [
            // PageView #0 : Initial Title
            Container(
              color: Colors.white,
              child: RaisedButton(
                elevation: 0,
                padding: EdgeInsets.symmetric(vertical: 16.0, horizontal: 24.0),
                color: Colors.blueAccent,
                textColor: Colors.white,
                child: Text(
                  'PageView #0\n\nMain Title',
                  textAlign: TextAlign.center,
                  style: TextStyle(
                      fontSize: 32.0,
                      fontWeight: FontWeight.bold,
                      fontStyle: FontStyle.italic,
                      textBaseline: TextBaseline.alphabetic),
                ),
                onPressed: () {
                  if (_pageController.hasClients) {
                    _pageController.animateToPage(
                      1,
                      duration: const Duration(milliseconds: 10),
                      curve: Curves.easeInOut,
                    );
                  }
                },
              ),
            ),
            // PageView #1 : Main
            Container(
              color: Colors.white,
              child: CustomScrollView(
                slivers: <Widget>[
                  SliverAppBar(
                    title: Text("PageView #1 - Main"),
                    backgroundColor: Colors.blueAccent,
                    pinned: true,
                    actions: <Widget>[
                      // action button
                      IconButton(
                        icon: Icon(choices[0].icon),
                        onPressed: () {
                          showAlertDialog(context);
                          _select(choices[0]);
                        },
                      ),
                      // action button
                      IconButton(
                        icon: Icon(choices[1].icon),
                        onPressed: () {
                          _select(choices[1]);
                        },
                      ),
                      // overflow menu
                      PopupMenuButton<Choice>(
                        onSelected: _select,
                        itemBuilder: (BuildContext context) {
                          return choices.skip(2).map((Choice choice) {
                            return PopupMenuItem<Choice>(
                              value: choice,
                              child: Text(choice.title),
                            );
                          }).toList();
                        },
                      ),
                    ],
                  ),
                  SliverAppBar(
                    backgroundColor: Colors.blueAccent,
                    floating: true,
                    expandedHeight: 70.0,
                    flexibleSpace: ListView(
                      children: <Widget>[
                        Text(
                          '  Sub-title 0',
                          textAlign: TextAlign.left,
                          overflow: TextOverflow.ellipsis,
                          style: TextStyle(
                              fontWeight: FontWeight.bold, color: Colors.white),
                        ),
                        Text(
                          '  Sub-title 1',
                          textAlign: TextAlign.left,
                          overflow: TextOverflow.ellipsis,
                          style: TextStyle(
                              fontWeight: FontWeight.bold, color: Colors.white),
                        ),
                        Text.rich(
                          TextSpan(
                            text: '  ', // default text style
                            children: <TextSpan>[
                              TextSpan(
                                  text: 'Sub-title ',
                                  style: TextStyle(
                                      color: Colors.white,
                                      fontStyle: FontStyle.italic)),
                              TextSpan(
                                  text: 'with Span-mode',
                                  style: TextStyle(
                                      color: Colors.white,
                                      fontWeight: FontWeight.bold)),
                            ],
                          ),
                        ),
                      ],
                    ),
                  ),
                  SliverList(
                    delegate: SliverChildBuilderDelegate(
                        (context, index) => Card(
                            child: ListTile(
                                leading: FlutterLogo(),
                                title: Text(
                                    '[Item #$index] Button pressed $_count times.'),
                                trailing: Icon(Icons.more_vert),
                                subtitle: Text('${_selectedChoice.title}'),
                                onTap: () => setState(() {
                                      if (_pageController.hasClients) {
                                        _pageController.animateToPage(
                                          (index + 2),
                                          duration:
                                              const Duration(milliseconds: 10),
                                          curve: Curves.easeInOut,
                                        );
                                      }
                                      _count++;
                                    }))),
                        childCount: 10),
                  ),
                ],
              ),
            ),
            // PageView #2 : Sub
            Scaffold(
              appBar: AppBar(
                title: const Text('PageView #2 - Sub-Menu 1'),
                backgroundColor: Colors.blueAccent,
              ),
              body: Center(
                child: _widgetOptions.elementAt(_selectedIndex),
              ),
              bottomNavigationBar: BottomNavigationBar(
                items: const <BottomNavigationBarItem>[
                  BottomNavigationBarItem(
                    icon: Icon(Icons.home),
                    title: Text('Home'),
                  ),
                  BottomNavigationBarItem(
                    icon: Icon(Icons.wb_cloudy),
                    title: Text('Cloud'),
                  ),
                  BottomNavigationBarItem(
                    icon: Icon(Icons.star),
                    title: Text('Star'),
                  ),
                ],
                currentIndex: _selectedIndex,
                selectedItemColor: Colors.white,
                backgroundColor: Colors.blueAccent,
                onTap: _onItemTapped,
              ),
            ),
            // PageView #3 : Sub
            Container(
              color: Colors.blueAccent,
              child: Center(
                child: RaisedButton(
                  color: Colors.blueAccent,
                  onPressed: () {
                    if (_pageController.hasClients) {
                      _pageController.animateToPage(
                        1,
                        duration: const Duration(milliseconds: 10),
                        curve: Curves.easeInOut,
                      );
                    }
                  },
                  child: Text(
                    'PageView #3 - Sub-Menu 2',
                    style: TextStyle(
                        fontWeight: FontWeight.bold, color: Colors.white),
                  ),
                ),
              ),
            ),
          ],
        ),
      ),
    );
  }
}

class Choice {
  const Choice({this.title, this.icon});

  final String title;
  final IconData icon;
}

const List<Choice> choices = const <Choice>[
  const Choice(title: 'Rotate Left', icon: Icons.rotate_left),
  const Choice(title: 'Rotate Right', icon: Icons.rotate_right),
  const Choice(title: 'Dissatisfied', icon: Icons.sentiment_dissatisfied),
  const Choice(title: 'Neutral', icon: Icons.sentiment_neutral),
  const Choice(title: 'Satisfied', icon: Icons.sentiment_satisfied),
  const Choice(title: 'Very Satisfied', icon: Icons.sentiment_very_satisfied),
];
마무리
비인기 언어의 선봉이였던 Dart를 단시일에 최고 인기 언어 중 하나로 끌어 올린 Flutter는 숙명적으로 corss-platform을 구현해야 하는 기업용 소프트웨어 및 모바일 소프트웨어 개발자들에게 많은 인기를 끌고 있습니다. 최근 Google의 오픈소스 사이트인 https://cs.opensource.google/ 에도 Dart와 Flutter가 등재되어, 더 많은 인기를 구가할 것으로 보입니다.

Creative Commons License (CC BY-NC-ND)